Complete Barrington Rainfall Statistics Workbook
To complete this part of the assessment, you must complete the following task/s to industry standards:
- Identify Workbook Output and Task Specifications
- Import Data and Calculate Statistics
- Import Data and apply Conditional Formatting using XLOOKUP or VLOOKUP
- Document Workbook Testing
- Document Instructions
- Save as a template
Use the information below and the criteria listed on the Assessment checklist to guide your responses.
Documents you will need for this task are:
- Assessment event (this document)
- BarringtonFarm_MonthlyRainfall_2021.pdf
- BarringtonFarm_MonthlyRainfall_AllYears.xlsx
- BarringtonPostOffice_RainfallStatistics_AllYears.xlsx
- CPPSSI5060_AE_Pro_ResourceDocument.pdf
Project Brief
- You have a client who records monthly rainfall for his farm Barrington Farm. He has asked you to create workbook where he can record his monthly rainfall totals and compare them with long term monthly averages from a nearby weather station.
- Your task is to create a macro-enabled workbook with 4 worksheets to hold and analyse the farm rainfall data.
- The workbook will calculate basic statistics for the rainfall measurements and compare them with long term Bureau of Meteorology records for the nearby Barrington Post Office weather station.
- Your client has supplied you with his handwritten rainfall records from last year, an Excel spreadsheet with rainfall records from previous years (2008-2019). You also have the Bureau of Meteorology records for the nearby Barrington Post office weather station in xlsx format.
- For your information only, the Bureau of Meteorology records were sourced from here:Station 091153 Monthly Rainfall (mm)
- This spreadsheet must be designed to allow for reuse; this means you can give it to your client who clears the rainfall measurements, inputs new measurements, and comparison analysis automatically updates.
Task 1: Identify Workbook Output and Task Specifications
1.1 Complete the following and then fill out the table below to identify task requirements:
- Read through the assessment
- Refer to the Resource Document for organisational guidelines for tasks
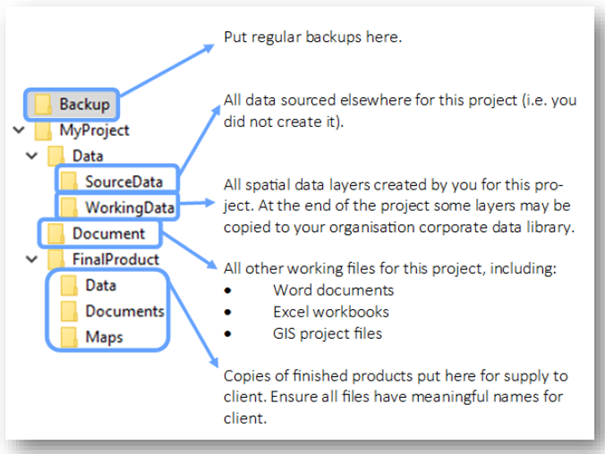
- Store the supplied data files (in the Pro_Part3_Files folder) in your MyProject > Data > SourceData directory
Workbook & Task Specifications
- Data source file/s
- Output workbook file name/s and formats
- Worksheet names and content
- Other output files
- Output file storage
- Documentation
- Reporting
1.2 Use Online Help Functions
Task 2 of this assessment requires you to Create a custom macro attached to a button control.
Use your web browser or the built-in Excel Help options to find out how to do the following:
- How to create a custom macro
- How to insert a button control
- How to assign a macro to a button control
1.3 Check Excel Functionality
- Check your Excel menu and make sure you have Menu Tab you need to insert a button control and record a macro.
- In the space below name the Menu Tab required and, if it was not visible, the steps you took to add it to your menu.
Task 2: Worksheet 1 Import Data and Calculate Statistics
- This worksheet (tab) is where your client will enter up to 12 monthly rainfall measurements for the current year and calculate some basic annual statistics.
- You can input the measure rainfall in the BarringtonFarm_MonthlyRainfall_2021.pdf file.
The Excel skills that must be demonstrated in this sheet are:
- Create a named range
- Use data validation (including input and error messages)
- Create a custom macro attached to a button control
- Save the macro within this workbook
- Create formulas including statistical functions
- Use named range in formulas/functions
- Use relative referencing in formulas/functions
- Use cell styles and formatting consistently through all tabs to enhance appearance and facilitate use of the workbook
- Set up worksheet protection
The task requirements are as follows:
2.1 Identify Worksheet Specifications
Read through this task and identify the worksheet specifications by completing the table below. Include a brief description of the worksheet feature in the Details column.
Record N/A (Not Applicable) in the Details column if a feature is not required for this worksheet.
Worksheet Specifications
Feature
- Linked worksheet
- Data Entry Validation
- Conditional Formatting
- Named range
- Formulas/ Functions
- Macro
- Form Controls
- Pivot Table
- Graph
2.2. Create a new workbook and name the first worksheet
Create and save a new workbook for this project and save it under MyProject > Data > Document. Give this worksheet (tab) a meaningful name
2.3. Enter the Rainfall data
Enter the supplied monthly rainfall measurements from the supplied file: BarringtonFarm_MonthlyRainfall_2021.pdf file
2.4. Label and colour data entry cells
Use cell labels and colour (cell formatting) to clearly indicate to your client the monthly rainfall measurements will be entered for the twelve months of a year.
2.5. Define a Named Range
Define a named range to contain up to 12 monthly rainfall totals (millimetres (mm)).
2.6. Set-up Data Entry Validation & Messages
- As the workbook designer, you must assume the user will try to enter incorrect data. The Bureau of Meteorology requires a minimum of 0.1mm of rain as a monthly total. Review the highest monthly totals for the Barrington Post Office and choose a suitable maximum value.
- Use data validation to make sure entered monthly rainfalls are decimals within a suitable range.
- Include input and error messages.
2.7. Insert a Button Form Control linked to a Macro
- Create a macro that will clear only the contents, not any formatting or other settings, of the measurement cells.
- Insert a button form control and link the macro to the button.
- This will allow the user to clear the rainfall measurements and enter a new set of measurements by clicking the button.
2.8. Enter Statistical Functions and Formulas
Enter functions or formulas (where there is no Excel function) to calculate the following basic statistics for 12 or less measurements in Worksheet 1 using the named range OR relative referencing.
o Total
o Count
o Mean
o Mode
o Median
o Maximum
o Minimum
o Spread (Range)
2.9. Use Logical Functions, Named Range and Relative Referencing
Modify your functions or formulas as required to make sure:
2.9.1 Use the named range you defined in Task 2.4, wherever possible,
2.9.2 Use relative referencing at least once in your functions & formulas.
2.9.3 The statistical functions only calculate if there are rainfall totals entered, by using a custom IF (logical) function.
2.10. Format Worksheet
- Format your worksheet. Design the layout and display to be simple, clear and professional.
- Label rows and columns and colour the input cells so the user can easily see where to enter monthly rainfall totals.
2.11. Protect the worksheet
- Protect this worksheet with all rainfall data entry cells unlocked.
- It may be helpful to review this video from the Student Workbook Topic 4, Lock cells (LinkedIn Learning, 1:08 min). It will explain how to protect selected cells in a worksheet.
- Write the password in a cell in this worksheet, so that the teacher/assessor can unlock and mark the worksheet.
Task 3: Worksheet 3 Import Data and Conditional Formatting using XLOOKUP or VLOOKUP
This worksheet (tab) compares the farm monthly totals collected over multiple years with the long-term monthly averages from the nearby weather station at the Barrington Post office.
Cell colouring, based on conditional formatting, is used to indicate which months, at the farm had less rain than the long-term average.
The Excel skills that must be demonstrated in this sheet are:
- Import data in Excel
- Set up conditional formatting, using VLOOKUP or XLOOKUP and logical functions.
- VLOOKUP or XLOOKUP using absolute referencing, relative referencing, links and logical functions.
- Set up worksheet protection
The task requirements are as follows:
3.1. Identify Worksheet Requirements
Worksheet Specifications
Feature
- Linked worksheet
- Data Entry Validation
- Conditional Formatting
- Named range
- Formulas/ Functions
- Macro
- Form Controls
- Pivot Table
- Graph
3.2. Insert and Name the Worksheet
Using your workbook from Task 2, insert a new worksheet (tab) a give it a meaningful name.
3.3. Insert a Copy of the Annual Measurements
Import into this worksheet the annual rainfall by month data supplied by the client BarringtonFarm_MonthlyRainfall_AllYears.xlsx.
Do not change the row and column format.
3.4. Insert the Barrington Post Office Monthly Statistics
- Insert another new worksheet and import the supplied monthly rainfall statistics from the Barrington Post Office weather station, (BarringtonPostOffice_RainfallStatistics_AllYears.xlsx) and give the worksheet a meaningful name.
- To complete the conditional formatting part of this task (Task 3.5), you will need to re-arrange this data so that the months labels become rows and the statistic labels become columns.
3.5. Apply Conditional Formatting using Lookup and Logical functions
- In the worksheet with the data from BarringtonFarm_MonthlyRainfall_AllYears.xlsx set up conditional formatting to colour/highlight identify which farm months are less than the long-term averages, for the matching month, from the Barrington Post Office weather station.
- Make sure the conditional formatting is applied to all months and all years.
- Make sure you choose an appropriate colour/highlight so that the rainfall totals can still be easily read.
- Tip: You can use either VLOOKUP or the new XLOOKUP within a formula in conditional formatting.
- Set-up conditional formatting on one year column, then use Format Painter to apply the conditional formatting rule to the all the other year columns.
- This resource will help you to apply the conditional formatting using VLOOKUP within conditional formatting. Look closely and the absolute cell references in the resource.
- Make sure the names of the months are the same in both worksheets.
3.6. Apply Conditional Formatting
- Apply a second conditional formatting rule to all rainfall monthly totals, so that cells with no rainfall totals are not highlighted.
- These cells had no recorded rainfall because the property owner was away. These not 0mm of rain but are null or entries and should not be highlighted as being less than the long-term monthly averages from the Barrington Post Office weather station.
3.7. Add a Key/Legend
Add a key/legend so the user understands what the conditional format colour/highlight means.
3.8. Format the Worksheet
Add headings, labels and design the layout and display to be simple, clear, and professional.
Task 4: Document Workbook Testing
Before you finish and submit your workbook, you should test each worksheet.
4.1. Test Worksheet 1 Monthly Rainfall Data
Follow the testing steps below and answer the questions. You can use the provided test data in the Assessment Resource document. If something doesnt work as it should, adjust your worksheet as required and document the changes you made.
Test Question
- Can you enter text in the monthly rainfall cells? (e.g., Spreadsheets Rock!) ?
- Can you enter invalid numbers? (e.g., 0.001)?
- You can only enter whole numbers?
- The macro button is not clearing the rainfall monthly totals?
- The statistics calculations do not update correctly if you change or delete any of the monthly rainfall totals?
- Can you edit any cells outside of the monthly rainfall total cells?
4.2. Test Worksheet 2 Annual Rainfall Data
Follow the testing steps below and answer the questions. If something doesnt work as it should, adjust your worksheet as required and document the changes you made.
Test Question
- Are cells that are above or equal to average rainfall highlighted?
- Are empty (null) rainfall cells highlighted?
Task 5: Document Instructions
5.1 Insert a new worksheet in your workbook to hold some instructions on how to use the workbook and give it an appropriate name.
5.2 Record some simple, step-by-step instructions explaining how to use the workbook and the output it generates.
5.3 Save a final version of your workbook under MyProject > FinalProduct > Documents
Task 6: Save as Template
- Format and save your workbook as a macro-enabled template (XLTM) file ready for a user to enter a new set of measurements.
- To include this file with your submission you need to save this file under MyProject > FinalProduct > Documents.