COSC1076 Vending Machine Assignment
- Subject Code :
COSC1076
- University :
RMIT University Exam Question Bank is not sponsored or endorsed by this college or university.
- Country :
Australia
1.INTRODUCATION
1.1Overview
In this assignment, you will use your C++ programming skills to create a front-end system for a vending machine. The vending machine serves all kinds of pastry treats. The companys name is Penelopes Pastry Delights and as such, the executable you are creating will be called ppd.
The following sections contain the details of this assignment. You are expected to understand every requirement explained in this document and implement all of them accordingly. This assignment has a strong emphasis on linked lists. You should get yourself familiar with this concept as soon as possible.
In this assignment you will:
- Practice the programming skills covered throughout this course, such as:
ADTs Linked Lists
Pointers
Dynamic Memory Management
File Processing
Program State Management
Exception Handling - Practice the use of testing
- Implement a medium size C++ program:
Use features of C++14
Use elements of the C++ STL - Work as a team
Use group collaboration tools
This assignment is divided into four Milestones:
- Milestone 1 (Group work): Test Cases, to be developed to ensure your ppd program implementation is correct (due week 10).
- Milestone 2 (Group work): A fully functioning implementation of the base ppd program, which pass Milestone 1 tests. The group work (milestone 1 & 2) is worth 25% of the course mark. Your group is required to demonstrate REQ5, 6, 8 and 9 in week 10 lab session (due week 10).
- Milestone 3 (Individual work): You will individually extend upon your groups implementation with additional functionality (called enhancements). The individual work is worth 15% of the course mark (due week 12).
- Milestone 4 (Group + Individual work): Written report (no more than 4 pages) analysing the design and implementation of your software, and the use of your test cases. You will demonstrate your group and individual work. This is where your final work will be graded (due week 12).
Group Progress Update (Group work):
Your group will need to provide regular updates on your progress in this assignment to your tutor during your weekly lab classes. This will require your group to have completed a list of activities. Group Progress Update will not be marked directly, however, this will influence the final grade.
1.2Group work
The group work must be completed in groups of 4.
- You may form groups with any student in the course.
- We strongly recommend that you form groups from within your labs, because:
Your tutor will help you form groups, but only within your lab.
You will have plenty of opportunity to discuss your groups progress and get help from your tutor during the rest of the course. It will be extremely helpful for your whole group to be present, but this cant happen if you have group members outside the lab.
If you form a group with students from multiple practicals, you will still need to be allocated to a single tutor and we may need you to switch labs to ensure everyone gets a fair amount of time.
Groups for Assignment 2 must be registered with your tutor by week 8 lab. Your tutor will register your group on Canvas. If you are unable to find a group, discuss this with your tutor as soon as possible. If at any point you have problems working with your group, inform your tutor immediately, so that issues may be resolved. We will do our best to help manage group issues, so that everybody receives a fair grade for their contributions. To help with managing your group work we will be requiring your group to use particular tools. These are detailed in Section 5.
There are important requirements about keeping your tutor informed if you have been unwell or other wise unable to contribute to your group. Remember your actions affect everybody in your group.
1.3 Learning Outcomes
This assessment relates to all of the learning outcomes of the course which are:
- Analyse and Solve computing problems; Design and Develop suitable algorithmic solutions using software concepts and skills both (a) introduced in this course, and (b) taught in pre-requisite courses; Implement and Code the algorithmic solutions in the C++ programming language.
- Discuss and Analyse software design and development strategies; Make and Justify choices in software design and development; Explore underpinning concepts as related to both theoretical and practical applications of software design and development using advanced programming techniques.
- Discuss, Analyse, and Use appropriate strategies to develop error-free software including static code analysis, modern debugging skills and practices, and C++ debugging tools.
- Implement small to medium software programs of varying complexity; Demonstrate and Adhere to good programming style, and modern standards and practices; Appropriately Use typical features of the C++ language include basic language constructs, abstract data types, encapsulation and polymorphism, dynamic memory management, dynamic data structures, file management, and managing large projects containing multiple source files; Adhere to the C++14 ISO language features.
- Demonstrate and Adhere to the standards and practice of Professionalism and Ethics, such as described in the ACS Core Body of Knowledge (CBOK) for ICT Professionals.
2.DESCRIPTION OF THE PROGRAM AND FUNCTIONALITIES
You have been approached by a company to create a front-end system for a vending machine written in C++. The vending machine serves all kinds of pastry treats. The companys name is Penelopes Pastry Delights and as such, the executable you are creating will be called ppd. In this assignment you are to implement an application that will perform the above tasks as a single user model.
This section describes in detail all functional requirements of this assignment. You should make a conscientious effort to write your program in a way that is capable of replicating the functionalities of the ppd program, described in the requirements below.
REQ1: Command-line arguments
A user of your program must be able to execute it by passing in the names of two data files that the system is to use. You need to check that exactly 3 command line arguments are entered. Your program will be run using these command line arguments:

For example:

REQ2: Load Data
Your program needs to be populated with the data provided in the 2 data files whose names are conveyed via the command line. You will need to tokenize this data in order to load it into the system. You may use the class definitions provided in the startup code to store your system data. As part of this requirement you need to ensure that the specified files are valid (that is, they exist and the data contained in them matches the specification for this assignment). You need to abort the program and provide a suitable error message if this is not the case.
Item (or stock) File Format:

Please note that the Price is stored as numbers delimited by the .. The number to the left of the . is the dollars and the number to the right will be the cents, for example:
Where the 3 represents the dollar component and the 50 represents the cents component of the price. A missing . from the price should be considered a data error.
You must ensure that items are inserted in the linked list sorted by name. Money data file format:

That is, there will be a row for each value of money that exists and the system will have an amount of each denomination. For example:

This means that the system currently has 3 x 10 dollar notes, 4 x 5 dollar notes, 20 x 2 dollar coins, etc. Note that the above denominations are the only valid denominations for your vending machine. The vending machine does not accept $20 or $50 notes. A valid file will always contain exactly 8 denominations, with no repeated denominations. If you wanted to initialise the vending machine with no change then the valid way to do that would be:

Please note that you cannot assume that the data contained in these files are valid. Some examples (this is not a complete list) might be, there may be lines with too many or too few fields, and the data in each field may not be of the correct type, range and/or length.
Sample (valid) data files have been provided with the startup code. Make sure that your program works with at least these files. We will also be testing your program with invalid data in the data files. We recommend that you get your program working for the (valid) provided data files first. Then spend some time testing for invalid files after you have completed most/all of the remainder of the assignment.
You should validate the contents of the files when loading. Please note that we may feed in file names when testing that dont end in .dat, so please dont validate for that. Likewise, you cannot assume the data files will be in the same directory as the executable, nor that we will have the same directory structure as you.
REQ3: Display Main Menu
Your program must display an interactive menu displaying 9 options. Your menu should look like this:
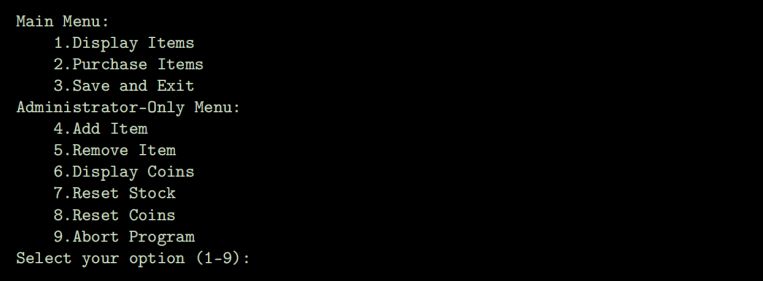
Your program must print out the above options and then allow the user to select these options by typing the number and hitting enter. Upon selection of an option, an appropriate task will be carried out.
Upon completion of all options except Exit, the user is returned to the main menu. You can assume that customers can only see the first three menu options, and the administrator can see all of them.
The behavior of these menu options is described in following requirements from REQ4 to REQ12
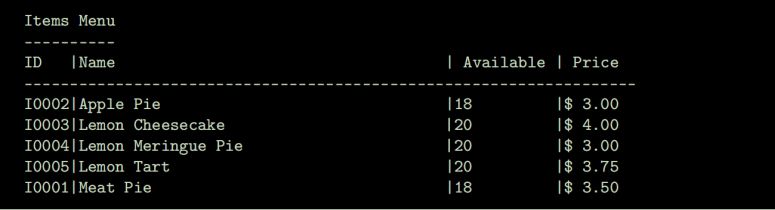
REQ4: Display Items
This option allows the user to request a display of the items available for purchase. This is the data loaded into the linked list in the REQ2. This requirement should behave as follows from the main menu, the user selects 1 and data should be displayed in the following format:
REQ5: Purchase Item
This option allows the user to purchase an item from the menu. This function is called from the main menu when the user has finally decided to purchase an item. This function allows the user to pay for their item by collecting money from them, and adjusting balances within the system as appropriate. Change is then given back to the customer, if appropriate. The number of items on hand should also be deducted. You should not allow an item to be purchased if there are 0 or less of that item on hand. For example, from the main menu, if the user selects 2, then the following should be displayed:

If the user enters the item ID I0001, and subsequently $2, $3 and $5 as prompted, then the following should be displayed:
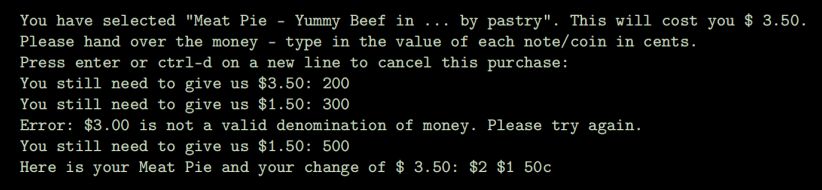
After which the user would be returned to the main menu.
When refunding money, you must display each note or coin separately used in the refund and you must ensure that prior to the sale that there is sufficient denominations in the system so that the customer is given the correct change. You must also subtract these coins from the coins array if a sale can take place. Note that coins entered to pay for an item can form part of the change that is given to the customer if that is required to give the customer the smallest amount of change possible. If ppd cannot give correct change then the sale should not occur, and your program should display an appropriate message explaining why.
If the user presses enter on a new line, refund all the coins/notes they have entered so far and return them to the main menu. If Ctrl-d is entered, then exit the program.
REQ6: Save and Exit
You must save all data to the data files that were provided on the command line when the program loaded up. When the saving is completed, you must have the program exit. The specifications mentioned for each file must be maintained and the program must be able to load up your files as easily as it loaded up the files that we have provided you with. Also, at this point, once you have implemented dynamic memory allocation, you must free all memory allocated and exit the program. A program which does everything but exit the program will still lose marks, as much as a program that does not implement any other requirement.
REQ7: Add Item
This option adds an item to the system. When the user selects this option, the system should generate the next available item id and associate that with this item. The user should then be prompted for the Name, Description and Price (a valid amount of money in dollars and cents). The item should then be allocated the default on hand value specified in the startup code. The new item id shall have an I prepended to it and will be 5 characters long. For example:

Please note that the price entered for an item must have a dollars and a cents component as above.
REQ8: Remove Item
Remove an item from a category and delete it from the system, including free memory that is no longer being used. For example,

REQ9: Reset Stock Count
This option will require you to iterate over every stock in the list and set its on hand count to the default value specified in the startup code. You should display a message once this is done such as where X is the default stock level specified in the startup code.

REQ10: Reset Coin Count
This option will require you to iterate over every coin in the coin list and set its count to the default value specified in the startup code. You should display a message once this is done such as where X is the default amount of coins specified in the startup code.

REQ11: Display Coins
This option will require you to display the coins as follows. In particular, the counts of coins should be correctly aligned, and they should be sorted from lowest to highest value:

REQ12: Abort
This option should terminate your program. All program data will be lost. You should also be freeing memory at this point as well.
REQ13: Return to Menu Functionality
Your program should allow the user to return to the main menu at any point during these options. The user can do this by hitting enter on an empty line. If the user is in the middle of a transaction, that transaction should be cancelled, and money refunded.
REQ14: Memory Leaks and Abuses
The startup code requires the use of dynamic memory allocation. Therefore, you will need to check that your program does not contain memory leaks. Use the following:

to check for memory leaks. Marks will only be awarded for this requirement if the feedback valgrind provides reports zero memory leaks and no other memory related problems.
Another common problem in is memory abuses. These are inappropriate accesses such as reading from uninitialized memory, writing to memory addresses you should not have access to and conditional statements (if, while, etc) that depend on uninitialized memory. You can test for these again by using valgrind:

Sample Executable
An executable of the program with most of the above-mentioned functionalities is provided. You can access and run the sample executable file directly on the school teaching server (e.g., via PuTTy on Windows) at the following location:?/KDrive/SEH/SCSIT/Students/Courses/COSC1076/apt/ppd. Once logged in with your RMIT credential, you can just cd into this folder, and follow the readme.txt file to run the executable file ppd.
3.DELIVERABLE
3.1 Mandatory Requirements
As part of your implementation, you must:
- Implement your own Linked List.
- Use your Linked List implementation to store the items for ppd.
- You may only use the C++14 standard library. You may not incorporate any additional libraries.
If you fail to comply with these mandatory requirements, marks will be deducted.
3.2 Milestone 1: Test Cases (Group Component)
For Milestone 1, you must develop test cases for your ppd implementation, including your enhancements. These test cases will help ensure that your ppd implementation is correct.
For a single test case, following 3 files need to be provided:
- .input - Input to provide to the ppd program via stdin.
- .output - Expected output from the ppd program on stdout.
- .expcoins - Expected output saved coin file when exiting ppd program.
Likewise if you have tests for the stock file, follow the above naming convention for your tests.
A test is run using the following sequence of commands.

If the first diff command displays any output, then the test has failed. This command checks to see if two files have any differences. The -w options ignores any white-space. The second diff command checks if two coin files (expected vs actual) have any differences. You should aim with your tests to thoroughly test all the functionality of your program. If you write insufficient tests, your program may fail our tests when we assess you.
3.3 Milestone 2: Basic ppd Implementation (Group Component)
For Milestone 2, your group must implemented the base ppd program as described in Section 2. Section 2 lists the components that your group must implement. Generally, it is up to your group to decide the best way to implement these components. However, there are some important requirements that your group must satisfy.
Aspects of this specification are flexible and open to your interpretation. It is up to your group to determine the best course of action. You will need to analyse and justify your choices in the report.
Your group will also need to consider the data structures that are used to represent aspects of ppd, and functionality. It is up to your group to make this decision provided that you meet the requirements in Section 3.1. In your report your group will be marked on your analysis of the above choices.
Finally, remember to do the the group contribution spreadsheet described in 5.3- fill this in on a weekly basis so it is accurate.
3.3.1 Group Demonstration
Your group is required to attend an assignment demonstration in Week 10 lab session. Your group will be required to demonstrate REQ5, 6, 8 and 9 in this demonstration using test cases you developed from Milestone 1. Please note that this includes implementation of any requirements that these options depend upon.
Each presentation should be around 12 minutes (for a group of 4), with an emphasis on showing what the group has done collectively as a team, as well as contribution from each individual to the project so far. Group work will be evaluated (see Section 8), and poor group work may result in mark deduction for individuals in the team (Section 7.3). You should also be ready to answer any additional questions about design and implementation from your tutor.
3.3.2 Group code and Test Cases
The deadline for submitting your groups Milestone 1 (test cases) and Milestone 2 (code for the ppd base implementation) is the end of Week 10 (11.59pm, Friday 12 May 2023 (Week 10)). See detailed information regarding submission instructions on Canvas.
3.4 Milestone 3: Enhancements (Individual Component)
In Milestone 3, as an individual you will make significant expansion(s) to the functionality of your groups ppd program. This milestone is your opportunity to showcase to us your skills, capabilities and knowledge! You will select your enhancements from the provided options in Section 4. Additionally, if you groups Milestone 2 solution has significant errors or is significantly incomplete, please read Section 4.3.
Milestone 3 is relatively open-ended. You are given some directives, however, there is a lot of room for you to make considered choices. However, this showcase of your skills is not just about making the code work. A major focus is on how you choose to implement an enhancement, and the justifications of the reasons why you chose a given data structure, class hierarchy, language feature, or algorithm to name a few examples. Enhancements are classified as minor or major. Enhancements must be substantially functional to get marks.
To get a higher grade you will need to implement one or more minor or major enhancements. This is described in the marking rubric.
3.4.1 Configurable Enhancements
Where reasonably possible, your enhancements should be configurable. That is, it should be possible to enable (or disable) each enhancement at run-time (not through compilation). In particular, this means your enhancements can be turned-off so that your program runs the same as Milestone 2 (verbatim).
3.4.2 Changes to Saved Stock file
Some enhancements may require you to modify the format of the saved-stock file. However, it is recommended that your program with enhancements still support loading stocks from the default saved-stock format used in Milestone 2.
To distinguish your new saved-stock format from the default Milestone 2 format, we recommend adding a special code at the start of your new saved-stock format, such as:

In addition, you can use a different file extension to further distinguish the new saved stock file, e.g., instead of using .dat, you can save the file using .sav as the extension.
3.5 Milestone 4: Written report (Group + Individual Component)
3.5.1 Written report
Your group must write a report, that analyses what your group has done in this assignment. Additionally, each individual must write a short report that analyses their individual enhancement(s). The group should combine the group report and the individual report and one group member should submit it via Canvas. The combined report is due at the same time as the individual submission (11.59pm, Friday 26May 2023 (Week 12)).
- The report should be A4, 11pt font, 2cm margins and single-space.
- The section of the report describing the groups work must be no more than 4 pages.
- Each individual must add 1 additional page about their enhancements.
- Thus the final report must not exceed 8 pages for a group of four.
- Only the first 4 pages (group), and 1 page (individual) will be marked.
- Modifying fonts and spacing will count as over length.
- Figures, Tables and References count towards these page limits.
In this assignment, you are marked on the analysis and justification of the choices you have made. Your report will be used (in conjunction with the demonstration) to determine the quality of your decisions and analysis.
Good analysis provides factual statements with evidence and explanations. Statements such as:
We did because we felt that it was good or Feature is more efficient
do not have any analysis. These are unjustified opinions. Instead, you should aim for: We did because it is more efficient. It is more efficient because . . .
We are asking for a combined report as it keeps the context of each individuals enhancements with the whole groups original implementation.
3.5.2 Group Component of the Report
In the group section of your report, you should discuss aspects such as:
- Your groups use of at least one linked list, and the reasons for where the linked list is used.
- Your groups choices of ADTs, and how these leads to a well designed program.
- The efficiency of your implementation, such as the efficiency of your use of data structures.
- The reason for each of your tests.
- Your group co-ordination and management.
3.5.3 Individual Component of the Report
In the individual section of your report, you should discuss aspects such as:
- The design of your enhancements, including any changes (and additions) to the data structures and ADTs you had to make when enhancing your groups implementation.
- The efficiency of your enhancements, such as the efficiency of your use of data structures.
- Limitations and issues that you encountered with your groups implementation.
4.SUGGEESTED ENHENCEMENTS FORMILSTONE 3
4.1 Minor enhancements
Minor enhancements are smaller in scope, and require only a small modification to your software design.
4.1.1 Help!
Whenever there is a user prompt, the user may type help and the program should display some text to help the user determine what they commands they may execute.
4.1.2 Better Invalid Input
Whenever the user enters invalid input at the user prompt, the program should show a useful error message to explain why the input was invalid.
4.1.3 Colour
Use colour to display (or highlight) the dollar amount that needs to be paid by the user. The Linux, Mac (and most similar) terminals support the use of colour through the use of escape codes. A simple internet search will show you tutorials for working with escape codes.
4.1.4 Popular Items
The program maintains a list of items that have been most frequently purchased by any user who has used your vending machine of ppd. You will need to devise a way to save, load, and display this list.
4.2 Major enhancements
Major enhancements are large in scope, and require significant modifications to your software design.
4.2.1 2-dimensional linked-list
Penelopes Pastry Delights sells different types of Meat Pie, e.g., Steak & Cheese, Chicken & Mushroom, Steak & Onion, and Spanish & Feta etc 1 . You can implement a 2nd linked-list to store information about these item options" for each item. For example, there could be also different kinds of coffee for the Coffee item on your linked-list as well, such as Latte, Cappuccino, and Espresso, etc 2. This means you need to implement a 2-dimensional linked-list, where we can first traverse on the item list, and then for each item, we can also traverse along a sub-list of item options. When displaying all items, then items on the item list as well as the sub-list should be all displayed.
4.2.2 Doubly-linked list
Re-implement your singly-linked-list for your ppd into a doubly-linked list, where you can navigate either in forward or backward direction on the list. In fact, you can start traversing the list from either the start or the end of the list now. Your functionalities for ppd as described in Section 2 should remain the same. For your implementation, you need to demonstrate that for both inserting and removing items functionalities, your doubly-linked list should be functional accordingly.
4.2.3 Reimplement the main menu using the Command design pattern
Design patterns are examples of common solutions to a problem that have been distilled into recommended approaches. With this extension you will use the Command pattern which is an object-oriented approach that uses inheritance to model menu items with text and a callable function. Please see this webpage: https://refactoring.guru/design-patterns/command for a further explanation. Please note that while the example provided uses the idea of buttons, it can just as easily be applied to menu items.
4.3 Milestone 2 Code with Significant Errors
This section is a general statement. This is provided as a starting point from which to approach your tutor.
This option may only be used if you have discussed the matter with your tutor. It is possible that your groups ppd program may contain errors. If the errors in the your groups ppd program are small, while you should fix these in your individual work, they are not considered a significant change.
However, if your groups ppd program has significant errors or is missing significant functionality, then you may be able to negotiate with your tutor to fix these error as a minor enhancement. As each groups program is different, this will be determined on a case-by-case basis.
Please note that this does not excuse you from failing to make sufficient contributions to your group. While you may be able to make-up some functionality in this milestone, you should not use this as an excuse to make an insufficient contribution.
5.MANAGING GROUP WORK
This group assignment can be conducted entirely online, without you ever meeting your group members faceto-face. This isnt a problem, with the available online tools. The challenge for you will be using these tools effectively. You will need to make extra efforts and be very dedicated and diligent in working with your team members. This will include setting up dedicated times for meetings and group programming sessions.
5.1 Group Work Tools
To help manage your group work, and demonstrate that you are consistently contributing to your group, we are going to require you to use a set of tools. Please note that if you do not use the recommended tools and something goes wrong such as issues with groupwork in your team, there is little we can do for you. Likewise please identify yourself when using these tools clearly so we can track contributions in the case of any dispute, e.g., in Git, use your student email address and your full name as registered with the university.
5.1.1 MS Teams
Each group will be required to create a team on the RMIT MS Teams platform. Your group must add your tutor to your MS team. If your group is from multiple labs with different tutors, add the tutor (who has a majority of the people from his/her lab) to the MS Team.
Your MS team will be the only official communication platform for the assignment. This means you must:
- Only use the MS Team channels for group chats.
- Hold all team meeting through MS Teams and record all team meetings (except for the conversations in the lab sessions).
- Store any group files (not in Git) in the MS Team.
If there are disputes, we will use the record on MS Teams as the source of evidence. You may not use other platforms (including Discord) as we cannot verify the identity of the users.
5.1.2 Git Repository
Your group must have a private Git repository that hosts your groups code. This may be on BitBucket or Github. Your group must add your tutor to this repository. This Git repository will be used as the evidence of your individual contribution to your group.
For the individual component you should copy/fork the repository before commencing your individual work.
All work completed by you must be committed to Git by you. If this is not done, we cannot track contributions in the case there is a dispute.
5.2 Suggested Weekly Schedule
On Canvas, we have provided a spreadsheet that contains a schedule of the suggested tasks your group should finish each week. Additionally, in the labs your tutor will compare your groups progress to this schedule. The tasks are flexible if your group runs into issues, such as a student being sick. However, you must inform your tutor of any issues so that you can negotiate with your tutor to rearrange the tasks.
5.3 Group Contributions
For Milestone 1 and 2 you will need to provide a record of your contribution to your group. This record is also contained on the schedule spreadsheet which has a location where each student can record their contributions. You should also note any issues that your have encountered on this spreadsheet.
5.4 Notifying of Issues
If there are any issues that affect your work, such as being sick, you must keep your group informed in a timely manner. Your final grade is determined by you (and your groups) work over the entire period of the assignment. We will treat everybody fairly, and account for times when issues arise when marking your group work and contributions. However, you must be upfront and communicate with us.
If you fail to inform us of issues in a timely fashion and we deem that your actions significantly harm your groups performance, we may award you a reduced grade. It is academic misconduct if you are deliberately dishonest, lie to, or mislead your group or teaching staff in a way that harms your group.
6.GETTING STARTED
6.1 Designing your Software
This assignment requires you and your group to design the ADTs and Software to complete your implementation. It is up to your group to determine the best way to implementing the program. There isnt necessarily a single right way to go about the implementation. The challenge in this assignment is mostly about software design, not necessarily the actual program run.
Trying to solve the whole program at once is too large and difficult. So to get started, the best thing to do is start small. You dont have to figure out the whole program at once. Instead, start with the smallest working program. Then add a small component, and make sure it is working. Then keep adding components to build up your final program.
You can get help about your ideas and progress through the lab updates. This is where you can bring your ideas to your tutor and ask them what they think. They will give you some feedback and ideas for your progress.
6.2 Start-up Code
The start-up code is very limited. It contains the following files:
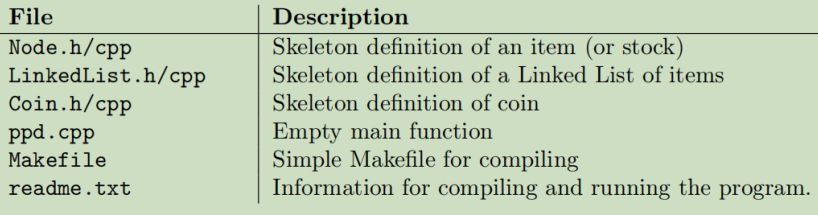
Note that you have the freedom to do whatever you wish for the start-up code (unlike Assignment 1), since we emphasize the importance of you coming up with your own design. Feel free to create new classes, or decide not to use some of the classes provided.
