HOW TO DEVELOP YOUR WBS?
- Country :
Australia
Introduction & Overview
There are six key steps needed to complete your Work Breakdown Structure (WBS). These include:
(1) Defining the Workstreams;
(2) Expanding on the Workstreams to include the Scope of Work;
(3) Inserting the Milestones;
(4) Adding predecessors and successors to facilitate sequencing;
(5) Adding durations to tasks; and
(6) Rationalising the sequencing.
The activities needed to complete each of these steps are explained in the following sections of this document.
1 Defining the Workstreams
For the first step, define the Workstreams that you will need to include, so the project can be completed successfully. An example of the Workstreams is provided in Table 1. This table also supplies a short overview of some of the key elements/work packages that would also typically be required to complete each Workstream.
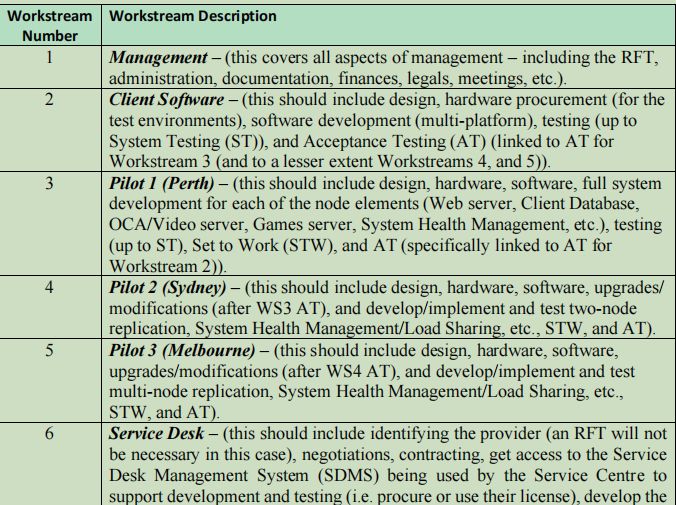
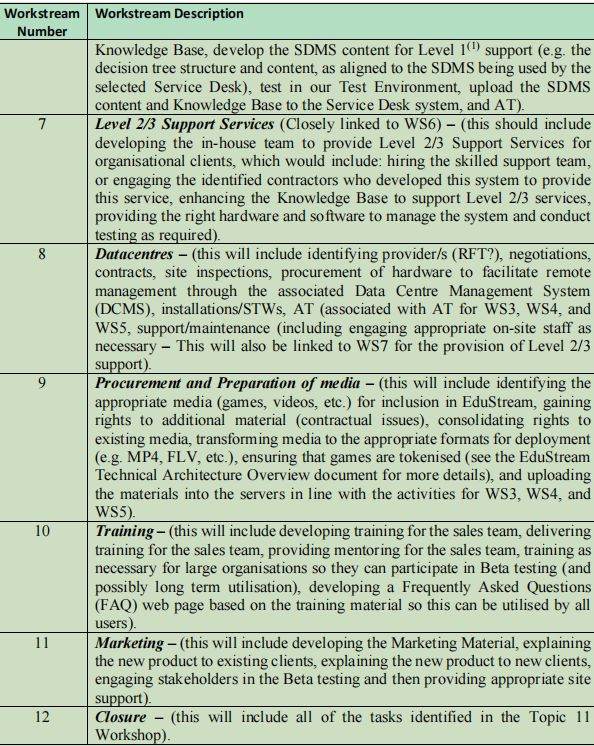
Please note that the information in Table 1 is not exhaustive and other Workstreams/elements/work packages would also typically be included. However, for the purposes of this assignment, this listing will be appropriate. If you want to gain top marks in your assignment, you will also identify others that reflect real-world practical realities.
To insert the Workstreams:
(1) Create a new Microsoft Project file and save this to your disk using the naming convention specified in the Assignment 1 Information Sheet.
(2) Highlight the Task Name column (by clicking on the top of the column).
(3) Right-mouse-click the top of the highlighted Task Name column, which will disclose a pop-up menu. From this menu select the Insert Column option. A selection list will then be displayed. Drag down the list and then select the Outline Number option.
Clicking on this will add the Outline Number column to the left of the Task Name column. It will help if you make this Outline Number column a bit narrower, by using the approach explained during the Topic 3 Workshop.
(4) For a minimum of 12 rows (to align with the Workstreams that you want to include), insert a Summary Task by clicking on the button shown to the right (which is in the Task Tab Ribbon).
(5) When inserting these Summary Tasks for the Workstreams, make sure that the digits shown in the Outline Number column are single whole numbers (e.g. 1, 2, 3, 4, etc.). If the numbers in this column are indicating the Workstream as a subordinate task (e.g. 1.1, 1.1.1, 1.1.1.1, etc.), select the Summary Task you want to change and click on the Outdent button (shown to the right - which is in the Task Tab Ribbon) until you get the Summary Task for each Workstream back to being a single whole number.
(6) In the successive rows within the Task Name column for each Summary Task, add in the titles (e.g. the highlighted text within Table 1) for each of the Workstreams that you want to include. Remember that you need to keep this title short (e.g. Management, Client Software, Pilot 1 (Perth), etc.).
(7) Once you have inserted all of the Workstreams that you require, move on to the next step.
2 Expanding on the Workstreams to include the Scope of Work
Once you have added all of the Workstreams you need, you should now broadly outline the associated Scope of Work for each, as individual tasks and groups of tasks (e.g. elements, subelements, work packages). The information provided in Table 1 gives you clues as to which subordinate tasks will be required. Additionally, these issues will be covered during the Topic 3 Workshop.
To insert these elements within the Task Name column you can either:
(1) Select the row where you want to insert the new task and then click on the New Task button (shown to the right, which is in the Task Tab Ribbon). If you click on the upper part of the button, it will simply add a new row. If you click on the down arrow at the bottom of this button, this will show a drop-down menu. From this, you can select Task, Recurring Task (e.g. setting up recurring meetings), or a blank row.
Generally, for this assignment, you would just insert tasks.
(2) If you want to add multiple new rows at once, bring your cursor across to the left of the screen, where the row numbers are shown. When you see your cursor as an arrow pointing to the right, hold down the left mouse key and drag the mouse down until you have highlighted the number of rows you want to add (these rows will be shown in grey highlight). Next, with the cursor still over this highlighted area, right mouse click.
This will show a pop-up menu. From this pop-up menu select Insert Task. Doing this will insert the number of rows that you selected, without removing your previous work.
Now that you have provided one or more rows for your tasks, start entering them within an appropriate hierarchy. An example of this is shown in the screenshot to the right, which shows a small part of Workstream 3 is Pilot 1 (Perth). Below this, you can see that at the second level (e.g. 3.1 and 3.2) we have inserted rows for key deliverables that will be required to achieve this Workstream. This includes providing the Web Server (3.1) and the Client Database (3.2). At this level, you would need to include all of the elements outlined in the EduStream Technical Architecture Overview and Table 1 (as appropriate).
For each of these elements, you would then need to include specific sub-elements or work packages. For instance, in this example for the Client Database, we will need Hardware (3.2.1) and Software (3.2.2).

The next level down from the preceding elements is used to define the steps that will need to be implemented. For instance, for the Software (3.2.2) we will need to conduct Design (3.2.2.1), Procurement of licenses for Oracle or another database environment (3.2.2.2), Development (3.2.2.3), and Testing (3.2.2.4). In the real world, you would then keep going down in levels until you get to individual Work Packages. For the purposes of this Assignment, we are only going down to about four levels. When inserting these tasks, make sure that the Outline Numbering reflects the appropriate grouping of the elements (as illustrated by the example in the screenshot provided above).
If the outline numbering for a task is not appropriate:
select the task that you want to modify; and
click on the Outdent or Indent buttons (as shown to the right which are provided on the Task Tab Ribbon) until the task is at the appropriate Outline Number level.
Once you have completed the insertion of the Scope of Work elements for all of the Workstreams, you can move on to the next step.
3 Inserting the Milestones
The next step entails inserting the milestones. These milestones should reflect those listed in Section 4.2 within your Project Charter. To insert a milestone, go to the row in your Project Plan that is below the last of the elements that will need to be completed prior to that milestone date. For example, the milestone for the Beta goes-live for the first Pilot CDN node (Perth) (as specified in the Assignment 1 Information Sheet) would be located below all of the preceding WS3 related tasks (e.g. by clicking on the row for the WS4 Summary Task).
Once you have selected the right row, click on the Insert Milestone button (as shown to the right - which is provided in the Task Tab Ribbon). This will insert a New Milestone row into the appropriate place within your plan.
It is best to adjust the Outline Number for the milestone, so it reflects the level of the tasks that feed into this. For example, if you are adding the milestone for the Beta goes live for the first CDN node (Perth) all of the pertinent preceding second level elements would feed into this, so you would adjust the outline number to the second level. You can adjust the outline level by using the Outdent/Indent buttons as discussed previously. In the Task Name column for the milestone, insert a short title, which aligns to the wording in your Project Charter (e.g. you would shorten the Beta goes-live for the first Pilot CDN node (Perth) to something like Beta Goes Live or CDN live Perth). Finally, in the Start column for the milestone, insert the date that has been defined in the Project Charter.
Once you have inserted all of the milestones into the correct positions within the project plan, you can then move on to the next step.
4 Adding predecessors/successors to facilitate sequencing
As discussed during Topic 4, adding predecessors (dependencies) is important because it allows the entire project to be sequenced. You add these for tasks and milestones within the Predecessors column within the Gantt Chart view. If the Predecessors column is not visible, follow the instructions covered in the Topic 4 Workshop to make it appear.
The key to achieving this step is to work out the logical flow and then define this by using the predecessor (dependency) model provided within MS Project. However, before discussing this model, it is important to explain two key terms, which are illustrated in Figure 1As shown in Figure 1, selected task refers to the task row that you have chosen within the project plan for the addition of predecessors (dependencies). In this case, it refers to Row 36, which is the milestone for Beta Goes Live. The term nominated task refers to the activities that will be linked as predecessors (dependencies). In this example, the nominated task numbers are shown in the right-hand column of Figure 1, which refer to the row numbers for those activities (similar to the row number shown in Figure 1). The example, in Figure 1 also demonstrates that multiple predecessors (dependencies) can be included. You just insert the row numbers for each nominated task and separate them with a comma. In MS Project 2019 you can also select the predecessors from a drop-down listing.

Within the Predecessor column you can also use four different types of dependency, which are defined as:
Finish-to-Start (FS).
This is the default for dependency in MS Project. It means that the nominated predecessor task must be completed before the selected task can commence.
Start-to-Start (SS).
This option means that the nominated activity must start before the selected activity can begin.
Finish-to-Finish (FF).
The FF dependency means that the selected activity must be finished before the nominated activity can be completed.
Start-to-Finish (SF).
This last type of dependency means that the nominated activity cant finish before the selected activity commences.
To complete this step, work through each of the tasks in your project plan and add in the appropriate dependencies. Putting some careful thought into this will make the following steps much simpler. The types of dependency and the techniques used for changing them are discussed in more detail during the Topic 4 Lecture and Workshop. Once you have completed adding all of the dependencies, move on to the next step.
5 Adding durations to tasks
The next step entails adding durations to each of the tasks. While doing this, please remember that a milestone has no duration. Additionally, there is no need to add durations to Summary Tasks, as these can be aggregated automatically from the subordinate tasks that they contain.
There are two commonly used ways for adding the durations. These are:
Add information in the Duration Column.
You can add numbers into the Duration column in the project plan Gantt Chart view. When doing this, the default will be Working Days. However, you can adjust this if necessary, by entering an MS Project dialogue box through the following sequence File>Options>Schedule>Duration is entered in. For the purposes of this assignment, days will be appropriate as the Duration measure, so no change from the defaults should be necessary. Please note that days in this context refer to Working Days (e.g. not including weekends and public holidays).
When entering the Duration in this way, the Start and Finish columns will adjust appropriately (if you have dependencies included that allow the program to understand the sequence). If this is not the case, you will then need to add a start date for that task, and the program will automatically work out the Finish date.
Adjusting the Start and Finish dates.
You can also enter the start and finish dates directly into the appropriate columns for that task. This will then automatically adjust the Duration column, so this reflects the start and finish dates that you have nominated.
In this step, begin by adding the approximate Duration that you expect each task will take. You will then refine this during the following step.
6 Rationalising the sequencing
Once you have inserted the information in the preceding steps for all of the pertinent elements, you can now implement the following approaches to rationalise the sequencing and ensure that the schedule is practical. These techniques are explained in the following subsections.
6.1 Manual Scheduling.
Up to this point, most of your tasks will typically be showing a thumbtack in the Task Mode column (this icon looks like the graphic to the right). This means that the task in that row is being manually scheduled.
You should also have noticed that as you inserted Durations for each task in the previous step, the program should have automatically adjusted the start and finish dates based on the predecessors that you included.
What you can now do is work your way through the various sections of the project plan and review the sequencing/scheduling manually. In particular, look for red-underlined elemeents in the Duration, Start and Finish columns. Additionally, look for Gantt chart bars that have a dotted line around them. These indicate that there is a problem with the scheduling for that task and/or an associated task.
Once you identify any of these problems, think about the reasons for the issue and then manually adjust various elements (e.g. change the duration, start/finish times, etc.) until all of the problems have been resolved. One of the best ways to do this is to find the milestones associated with a group of tasks and look at how those tasks feed into the milestone. Therefore, if you have spare time to complete the tasks for that milestone, you can manually increase the scheduled durations, or move the associated milestone to an earlier date. Alternately, if you find that the time allocations would not allow you to meet the milestone you can either:
Shift the milestone date.
In some cases, you may be able to shift soft-wall milestones to a later date. However, be very careful when doing this, as there will often be other ramifications created for the following tasks.
Rationalise the time allocations for tasks.
There is often a tendency to pad original estimates, so there is more time allocated to a specific task than what is needed. If you find that you cant meet a milestone (and particularly a hard-wall milestone) because of the length of the task-based project path, it is common that you will go back and rationalise this. Firstly, check that the amount of time allocated is sensible. If it looks like being too much time, think about reducing this. In the real world, you would normally do this by working with the subject matter experts. However, for this assignment, just use your common sense. If you think that something can be done validly in a specific timeframe, adjust your timings accordingly.
It is often best to do this type of manual scheduling first, before you apply the automatic tools. However, the automatic scheduling can also be quite useful (particularly for some complex projects).
6.2 Automatic Scheduling
You can use the MS Project capabilities for automatic scheduling. This can be a powerful tool and can save you time and effort. However, be careful when using this.
If you have not sequenced your project correctly, it can completely throw out your schedule.
To implement automatic scheduling, highlight the cells that you want to adjust, by using the technique discussed earlier in this guide. Once you have done this, do one of the following:
Click on the Auto-Schedule icon in the Task Tab Ribbon. This icon looks like the screenshot shown to the right. You will notice that this automatically changes the icon in the Task Mode column for the highlighted row/s, so it looks like the top section of the diagram to the right. The MS Project program will also automatically adjust the schedule and this will be reflected in the Duration, Start and Finish columns, as well as within the Gantt chart.
Alternately, you can highlight the task that you want to adjust and you can click in the appropriate cell within the Task Mode column for that task. This discloses a drop-down arrow to the right of the cell, which allows you to toggle between Manually Scheduled and Auto Scheduled. Once you have changed this, you will find the task will be adjusted similarly to what was described in the preceding dot point. This use of auto-scheduling can be very powerful, but it is recommended that you do not adjust the whole schedule at once. It is typically best to rationalise the schedule in a series of steps, which can include the following:
Firstly, leave the hard wall milestones in the Manual Schedule mode.
Next highlight the tasks that feed into that milestone and adjust them to Auto-Schedule.
Carefully review the changes that have been applied by the computer and manually rectify problems using the Manual Scheduling approach outlined in Section 6.1.
